GETTING STARTED - AZURE AD
In this tutorial, you'll learn how to integrate WestFax with Azure Active Directory (Azure AD).
When you integrate WestFax with AD, you can:
- Control in Azure AD who has access to WestFax Fax numbers.
- Enable your users to be automatically signed-in to WestFax with their Azure AD accounts.
- Manage your accounts in one central location.
Prerequisites
To get started, you need the following items:
- Azure AD subscription
- WestFax Enterprise account with AD/SSO enabled.
Configuring WestFax for SSO
If you have enabled SSO/AD with WestFax you are just a few steps away from enabling single sign on with WestFax.
Here are the steps to get your SSO setup with WestFax:
In order to utilize SSO and Active Directory sync you must have SSO enabled on your account. Contact your account manager and ask them to activate this functionality. There may be some setup fees involved. Your account manager can walk you through the process.
After you are enabled you will want to login to the admin tool and go to the SSO tab and you should see a screen like this:
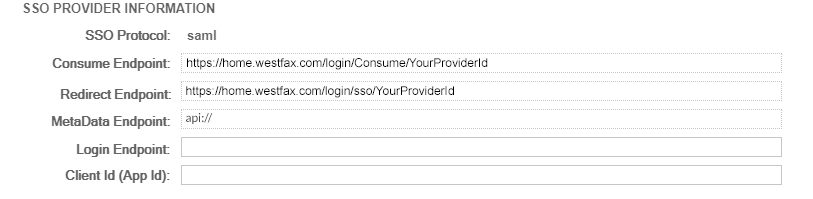
There are three values here you want to copy for use in the Azure setup:
Consume Endpoint:
Redirect Endpoint:
Metadata Endpoint:
After you are enabled you will want to login to the admin tool and go to the SSO tab and you should see a screen like this:
There are three values here you want to copy for use in the Azure setup:
Consume Endpoint:
https://home.westfax.com/login/Consume/YourProviderIdRedirect Endpoint:
https://home.westfax.com/login/sso/YourProviderIdMetadata Endpoint:
api://{{clientId}}You will need these values later. Copy them somewhere for use.
At this point you need to log in to Azure AD website for your organization. With the values you copied above you will add a connection to WestFax's SSO provider.
Here are the steps:
Here are the steps:
- Login to AD Cloud
With your admin account log into the Azure AD cloud website. - Go the Azure Active Directory Section
- Click on App Registrations -> New Registrations
- Create the New App Registration
You can name the Display name anything. It doesn't affect the integration. In the box below you want to copy theConsume Endpointfrom above into theRedirect URI (Optional)field. - Copy your Client ID and Login Endpoint.
After you hit Register you will return to the Application Settings page. You will need to copy theApplication (client) IDand theSAML-P sign-on endpoint. You can see the sign-on endpoint by clicking Endpoints on the top of the page to launch the endpoint pop-out.
See below: - Click Authentications on the Left Menu
On the Authentications page we are going to set several properties.
UnderImplicit grants and hybrid flowsyou will check the box labelledID Tokens. Next UnderAdvanced Settingsyou willAllow Public client flows. - Click Token Configuration on the left menu
Click the+Add optional claim-> and then in the pop-out selectSAML. Then in the drop down selectEmailand then click Add. - Click Expose and Api on the Left menu
Now you need to set the Application ID URI. Click the link namedSetand and box will popup labelledSet the App ID URI. Copy the value from the first step labelledMetadata Endpoint. Add the ClientId to the end of API:// and then click Save.
Now you will want to copy the two values from the Previous step into the WestFax SSO panel. Then we'll also add your Azure x.509 certificate as well. You will need to login to the WestFax Admin panel first and click on the SSO section.
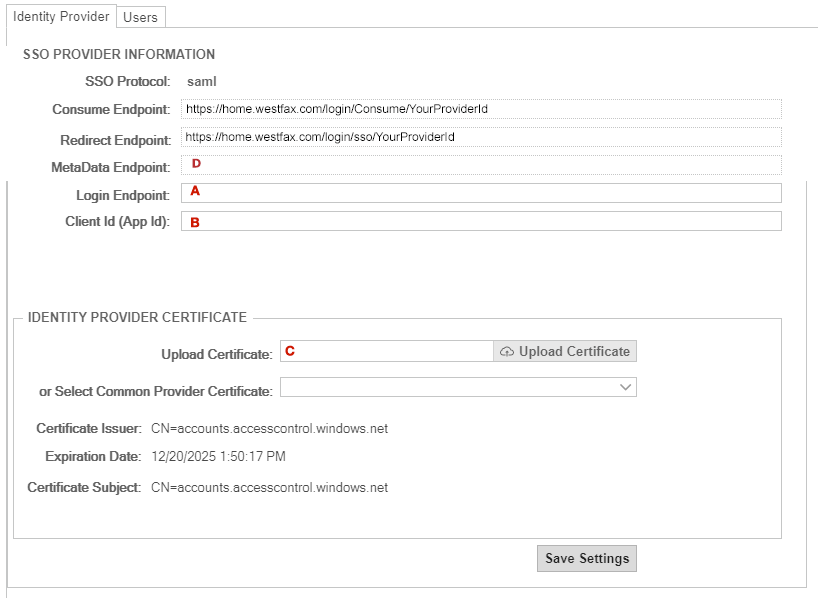
Here is the screen you will add your settings.
Needed Settings:
When you are done click Save Settings.
You are now setup for SSO!
You will want your team to login using the
Here is the screen you will add your settings.
Needed Settings:
A - Login Endpoint - This comes from the previous step in Azure.B - Client Id (App Id) - This comes from the previous step in Azure.C - Certificate x.509 - This comes from your Azure installation.D - MetaData endpoint - This comes from your Azure Client ID. It should be API://{{clientId}} where the clientId is copied from the above step. It is not a valid URL so do not browse to that location.When you are done click Save Settings.
You are now setup for SSO!
You will want your team to login using the
Redirect Login link.If you have any questions please reach out to us directly at 303-299-9329 or contact your account manager.