How to Send a fax with the new WestFax Print Driver
WestFax offers convenient fax-sending options that eliminate hassle. With the WestFax Print To Fax driver, you can send faxes directly from your computer, similar to printing a document. Simply install the driver, and faxing becomes as effortless as printing.
 WestFax provides multiple ways of sending a fax, making the process simple and painless. Most don’t even require you to walk away from your computer. One popular method is to use the WestFax Print To Fax driver. It’s a small program that installs on your computer and emulates a Windows printer. Once you have installed it, sending a fax is as easy as printing a document.
Here is how it works:
Step One: Download and Install the Print To Fax Driver
First,download the free Print To Fax driver. When you open the downloaded file, you’ll have two options. If you’re using a newer 64-bit version of Windows, double-click on the “x64” installer. For 32-bit versions of Windows, choose “x86” instead. (If you’re not sure which Windows version you have, click here to learn how to get that information.)
When the installation program starts, simply click “Next” to accept the default settings, and then click “Finish” on the last screen. The whole process takes less than a minute.
The first time the program runs it will open an empty window like this:
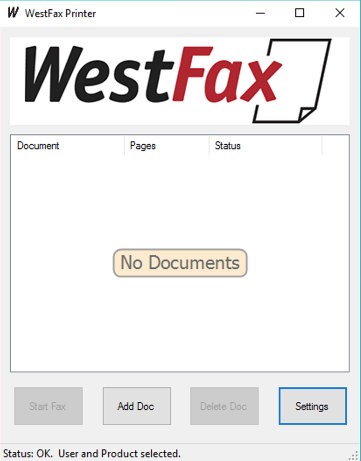
Click “Settings” and enter the login information that you entered when you set up your WestFax account. (To set up an account and start sending faxes right away, visit the WestFax website.) Here’s a pro tip: if you check the “Remember Me” box under user settings, you won’t have to enter this information every time you restart your computer.
Step Two: “Print” Your Document to Fax
Next, open the document that you want to fax. Let’s say, for example, that you want to send a copy of your resume, which you created in Microsoft Word. Simply open the document and choose Word’s “Print” command (Ctrl-P will also work). When the Print menu opens up, the “WestFax Printer”, then click the “Print” button.
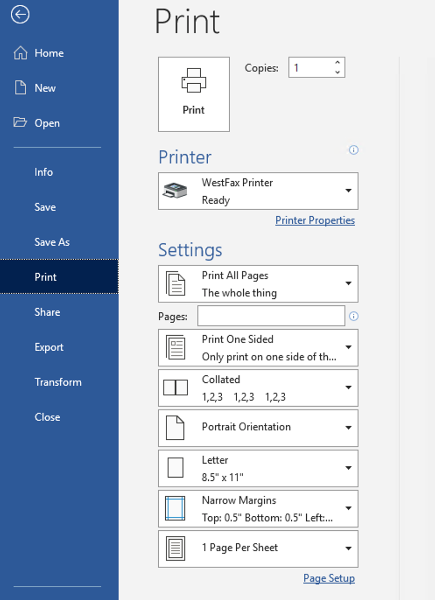
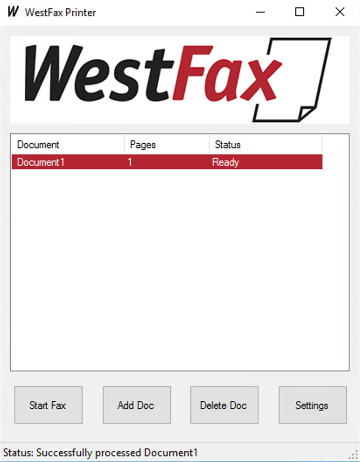
This will add your document to the list of outgoing faxes in the WestFax Printer window. (Don’t worry: it hasn’t been sent yet… that’s the next step!) Your window should look something like this:
Step Three: Enter Your Recipient’s Information and Send
Next select the fax you want to send (so that it’s highlighted in red, like the picture above), and click on the “Start Fax” button. A new window will open up where you can enter your recipient’s fax number. Simply enter that information in the “Fax Number” field, or select the “Contact” button to choose a recipient from your list of contacts.
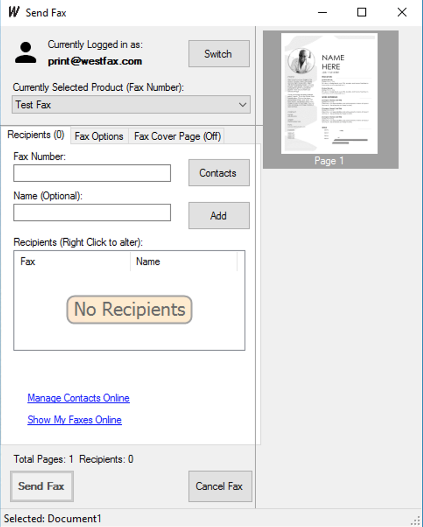
Click “Add” to add the fax number to the list of recipients. You can send the same fax to multiple recipients simply by adding more of them to the list.
By selecting the “Fax Options” tab, you can add a descriptive header to your fax, a subject line, and a reference (such as an account number, for example). If you need to specify a particular individual as the recipient, you can also enter that information here.
On the “Cover Page” tab, you can select a pre-defined cover page, and you can add additional notes to appear on the cover page, – for example “It was great speaking to you this afternoon. Here is a copy of my resume, as we discussed.”
To finish the process, simply click the “Send fax” button. You will see a message that indicates your fax has been sent successfully. You’re done!
Although the example we have provided is based on printing from Microsoft Word, theWestFax Print To Fax driver really allows you to send a fax from virtually any application because it emulates a Windows-compatible printer. You could use it to send a PDF, an Excel spreadsheet, or even a web page. Any document that you could print to a normal printer can also be sent using the Print to Fax driver. To start sending faxes today,visit the WestFax website to learn more about our Business Fax and HIPAA-compliant Healthcare Faxservices. To talk to a sales account manager, contact us at (800) 473-6208, or via e-mail at sales@westfax.com.

