The Easiest Way to Resend a Fax That Failed
 Recognizing the need for flexibility and efficiency in document transmission, we have introduced a new feature in our home portal: the ability to easily resend faxes.
This addition is designed to streamline the process, ensuring that your faxes reach their intended destinations without hassle. Whether you're dealing with a transmission error such as a "No Answer", "Busy", etc., or need to send documents to additional recipients, our guide below will walk you through resending a fax.
Step 1: Log Into the Home Portal
The first step is to access the home portal. Enter your credentials to log in.
Step 2: Navigate to the Outbox
Once logged in, click on the "Outbox" on the left-hand side of the screen. Here, you'll find a list of faxes you've previously sent.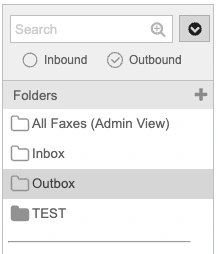
Step 3: Locate the Fax You Wish to Resend
Browse through your Outbox to find the fax you want to resend. This might require some scrolling, depending on how many faxes you send.
Step 4: Resend Your Fax
Right-click on the fax you've chosen to resend and select the "Resend" option.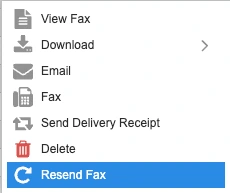
Step 5: The "Send Fax" Dialog
The "Send Fax" dialog will appear, pre-filled with the fax number you originally sent the document. You can resend it to the same number, change the recipient, or add additional fax numbers if needed.
Step 6: Complete the Required Fields
Fill in the other necessary fields such as the header, subject, and reference to ensure your fax contains all the required information for the recipient.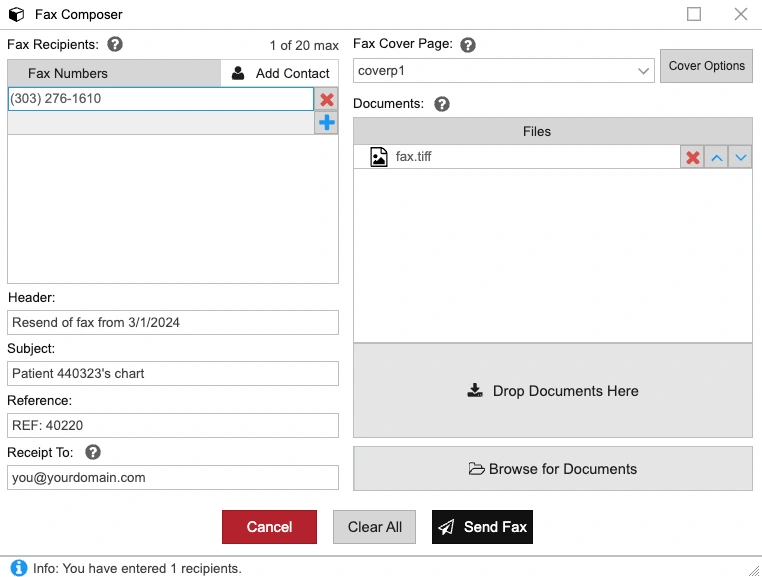
Step 7: Choose Your Cover Page
Select a cover page for your fax. This is the first page the recipient will see, so choose one that suits the context of your communication. This is optional but recommended when sending a fax with sensitive information.
Step 8: Customize Your Cover Page Message
Click "Cover Options" to add a message to your cover page. Personalizing this message can make your fax stand out and convey your message more clearly.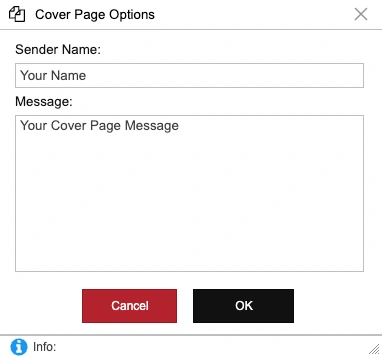
Step 9: Prepare the Document
The document you're about to send will automatically be filled with "fax.tiff", a copy of the original fax. If you need to send additional documents, this is the time to add them.
Step 10: Send Your Fax
After ensuring all information is correct and all necessary documents are attached, click "Send." Your fax will now be on its way to the recipient(s).
Resending a fax through the home portal is designed to ensure your faxing is as effective and efficient as possible. By following these steps, you can rest assured that your documents will reach their intended recipients, whether you're correcting a previous error or simply need to send the information to more people.
NOTE: When sending faxes online, keep in mind that transmission times can vary significantly. The duration largely depends on the document's size and complexity, as well as the recipient's fax machine capabilities. Typically, it can take anywhere from 30 seconds to 1.5 minutes per page, contingent on the fax connection speed with the recipient. The fax you are resending will appear in the outbox as "Sending" with 0 pages. The number of pages will change to the actual number upon completion of the transmission. If the receiving end uses an old or slower fax machine or has a noisy analog (POTS) line, this could increase transmission time. Busy signal retries can further extend the time. Therefore, while online faxing is generally efficient, factors such as the document's details and the recipient's equipment play a role in determining how quickly your fax will be delivered. Once the transmission is complete you'll see in the status field "Sent" if successful or any other error that may have been encountered (Busy, No Answer, No Fax Device, etc.).